
This post was most recently updated on September 28th, 2017
Hello everyone, today we will discuss about basic understanding of XSLT and how to customize list view by custom XSLT in SharePoint 2013.
XSLT basics
XSLT stands for XSL transformation. XSLT allows you to transform structured data (xml) with style sheet (xsl). Here xsl (eXtensible Stylesheet Language) is Language for styling a xml data.
XSLT structure
|
1 2 3 4 5 6 7 8 9 10 11 |
<xsl:stylesheet version="1.0" xmlns:xsl="http://www.w3.org/1999/XSL/Transform"> <xsl:template match="/"> <html> <body> <xsl:value-of select="@ID"/> //tags to process data. </body> </html> </xsl:template> </xsl:stylesheet> |
<xsl:stylesheet>
The root element of an XSL style sheet is <xsl:stylesheet> or <xsl:transform>.
Note: <xsl:stylesheet> and <xsl:transform> are completely synonymous and either can be used!
The correct way to declare an XSL style sheet according to the W3C XSLT Recommendation is:
|
1 2 3 4 5 6 7 |
<xsl:stylesheet version="1.0" xmlns:xsl="http://www.w3.org/1999/XSL/Transform"> </xsl:stylesheet> OR <xsl:transform version="1.0" xmlns:xsl="http://www.w3.org/1999/XSL/Transform"> </xsl:transform> |
This element is always at the top of XSLT document.
In SharePoint we add some additional rules in root element.
|
1 2 |
<xsl:stylesheet xmlns:x="http://www.w3.org/2001/XMLSchema" xmlns:d="http://schemas.microsoft.com/sharepoint/dsp" xmlns:cmswrt="http://schemas.microsoft.com/WebParts/v3/Publishing/runtime" xmlns:xsl="http://www.w3.org/1999/XSL/Transform" xmlns:msxsl="urn:schemas-microsoft-com:xslt" version="1.0" exclude-result-prefixes="x d xsl msxsl cmswrt"> </xsl:stylesheet> |
<xsl:output>
The <xsl:output> element defines the format of the output document.
Note: <xsl:output> is a top-level element, and must appear as a child node of <xsl:stylesheet> or <xsl:transform>.
|
1 |
<xsl:output method="xml|html|text|name" indent="yes|no" /> |
<xsl:template>
An XSL style sheet consists of one or more set of rules that are called templates.
A template contains rules to apply when a specified node is matched. The match=”/” attribute associates the template with the root of the XML source document.
|
1 2 |
<xsl:template match="/"> </xsl:template> |
Calling a template which rules is below :
|
1 |
<xsl:call-template name="dvt_1.empty"/> |
XSLT construct element
- <xsl:variable> : to create xslt variable
Ex: <xsl:variable name=”dvt_RowCount“ select=”count($Rows)“/> - <xsl:value-of> : to extract the value of a selected node.
Ex: <xsl:value-of select=”@ID“/> - <xsl:for-each> : element allows you to do looping in XSLT.
Ex: <xsl:for-each select=”$Rows“>process data</xsl:for-each> - <xsl:if> : element is used to put a conditional test against the content of the XML file.
Ex: <xsl:if test=”@ID > 0“> process data </xsl:if> - <xsl:choose> : element is used in conjunction with <xsl:when> and <xsl:otherwise> to test multiple condition.
Ex:12345678<xsl:choose><xsl:when test="$dvt_IsEmpty"><xsl:call-template name="dvt_1.empty"/></xsl:when><xsl:otherwise><xsl:value-of select="@ID"/></xsl:otherwise></xsl:choose> - <xsl:sort> : element is used to sort the output based on column either ascending/descending .
Ex: <xsl:sort select=”@ID“ order=”descending“ data-type=”number“/>
For more info about xslt tutorial click here…
In SharePoint XSLT is more prominently used in various web parts like
- List View web part
- Content Query web part
- Search web part
- Data View web part etc.
Basically XSLT is used in SharePoint to format the display of above web parts. If you want to customize web parts view you have to edit default .xsl file or create your own custom .xsl file. The Advantage of external xsl file is we can reuse it in publishing site with different web parts.
Each publishing site has a special document library called “XSL Style Sheets” (within the “Style Library”) to keep all default Style Sheets. We explore these document library by using SharePoint Designer. Overall look and feel of SharePoint Web Part system was handle by following default style sheets:

- SummaryLinkMain.xsl: Structure for Summary Link Web Parts
- ContentQueryMain.xsl: Overall structure of Content Query Web Parts
- LevelStyle.xsl: Useed in various places
- Header.xsl: Column header and grouping styles
- ItemStyle.xsl: Main stylesheet for controlling DIV- and TR (row)-level styling
- TableOfContents.xsl: Used in the Table of Contents Web Part
- RSS.xsl: Default look of RSS Feed Web Parts
However, all above style sheets can be overridden. There are three basic ways to customize XSLT file in SharePoint
- Edit above default xsl file and use it. The changes will reflect in Entire site collection
- Edit web part XSLT file within its properties
- Create your own custom xsl file and use within web patrs. This is more secure way of customizing the XSL based on business requirnment
Follow steps to create custom xsl for customize list view web part
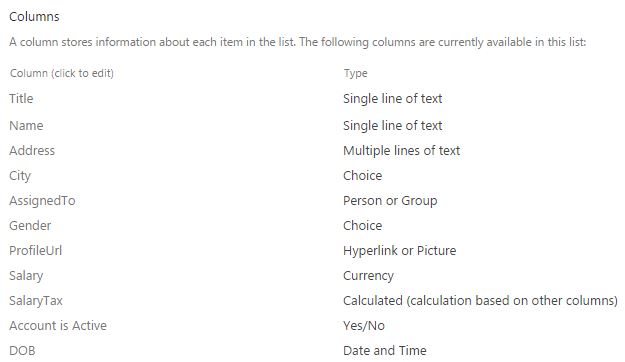
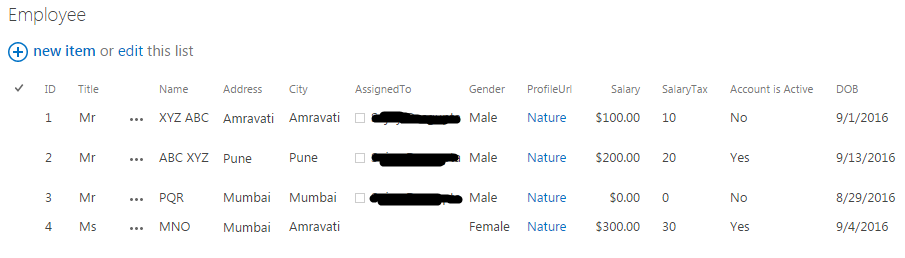
- Create sample list named ‘Employee’ with following columns.
- Create Test page and add above list view web part on page.
- Now we create custom xsl to customize above ‘Employee’ list web part view. Lets do it.
- Open SharePoint Designer 2013 and upload customList.xsl to the Style Library or any document library where you want to keep.
- Configure ‘Employee’ list view web part property.
- Now edit Test page in SharePoint out of box.

- Edit ‘Employee’ list web part view.

- Open up the Miscellaneous section, paste XSL path into xsl link text box and click to apply/ save button to save configuration.

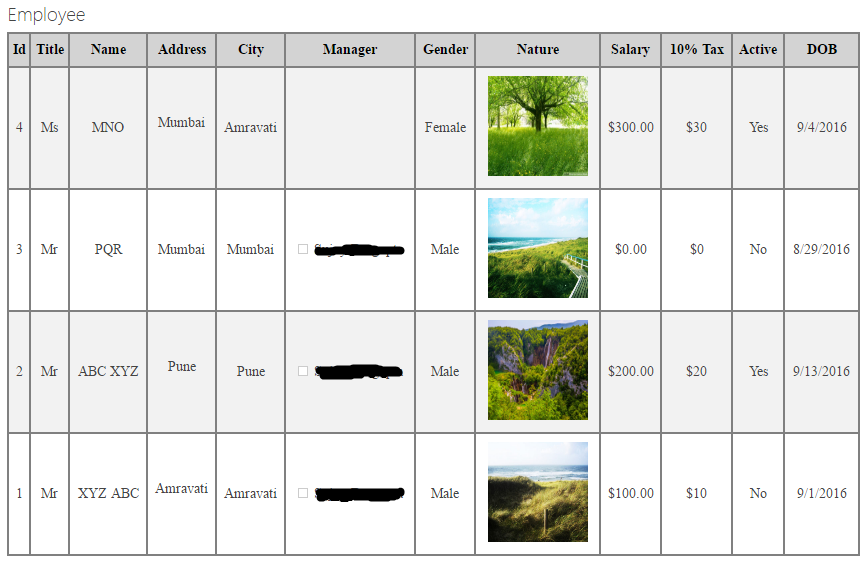
- Now see the Test page where ‘Employee’ List View looks very attractive.
- Now edit Test page in SharePoint out of box.
Situation where and when we use xslt in SharePoint
- In various form of Presentation like Tiles, Sliders FAQ from the List view webpart
Hello Ranjit,
I’m trying to output divs rather than a table, but I’m finding I add a class to a div based on a condition.
background-color: green;
background-color: orange;
background-color: red;
I’ve tried with using both the style attribute and class attribute, but neither works. I get a error stating the “Unable to display this Web Part.
Any ideas?
Hello Eric,
Here is two ways to achieve color in XSLT.
‘Color Name’ should be column name from list be sure it dropdown column.