Hello everyone, welcome to my yet another PowerApps Blog series. In this blog, we explore Office 365 Users connection, how to add Office 365 Users as a connection, add Office 365 Users as a data source to your app.
Office 365 Users Connection
Microsoft provide an Office 365 Users connection to access organization profile using Office 365 Account. Office 365 Users are performed various actions such as get your profile, another user’s profile, a user’s manager or direct reports.
Add a connection
- Create a PowerApps blank app.
- Click on Connect to data and then select a New connection from a side panel.

- From connections, search Office 365 Users connection. Once you get the connection then click on Create.


Available functions in Office 365 Users
- MyProfile(): Get current user profile
- UserProfile(): Get specific user profile
- Manage(): Get manage profile of current/specific user
- DirectReports(): Returns the direct reports for the specified user
- SearchUser(): Retrieves search results of user profiles
- MyTrendingDocuments(): Get trending documents of current user
How to use a connection
Using Office 365 Users connection we do following actions
- Get current user profiles
- Get another user profile
- Get directs reports of another user
- Get trending documents
- Search users
– Current user profile
-
On the Insert menu, select Label
-
In the function bar, set its Text property to Office365Users.MyProfile().DisplayName

- Office365Users.MyProfile() helps to get information like department, mail, id, job title, surname etc of Logged in user.
– We also get information of another user by specifying an email address like Office365Users.UserProfile(“test@domain.com”).DisplayName
– Show the direct reports of another user by specifying an email address like Office365Users.DirectReports(“test@domain.com”) to Gallery Item property.
– To show information about another user’s manager by specifying an email address like Office365Users.Manager(“test@domain.com”).DisplayName
– Search for users we use Office365Users.SearchUser({searchTerm: SearchTerm.Text}) by setting Item property of Gallery
SearchTerm.Text is input text control name SearchTerm. The gallery shows users whose name contains the search text you entered.
How to get My Trending Documents
- On Insert menu add a Button control and set OnSelect property to
12345ClearCollect(ColTreandingDocuments,Office365Users.MyTrendingDocuments({'$filter':"ResourceVisualization/Type eq 'PowerPoint' or ResourceVisualization/Type eq 'Word'"}).value);Collect(ColTreandingDocuments,Office365Users.MyTrendingDocuments({'$filter':"ResourceVisualization/Type eq 'Excel' or ResourceVisualization/Type eq 'Pdf' or ResourceVisualization/Type eq 'OneNote'"}).value);Navigate(Screen2,ScreenTransition.Cover)
Here we create a collection ColTreandingDocuments of current users. Trending documents with filtered documents like PowerPoint, Word, Excel, Pdf, and OneNote can be applied.

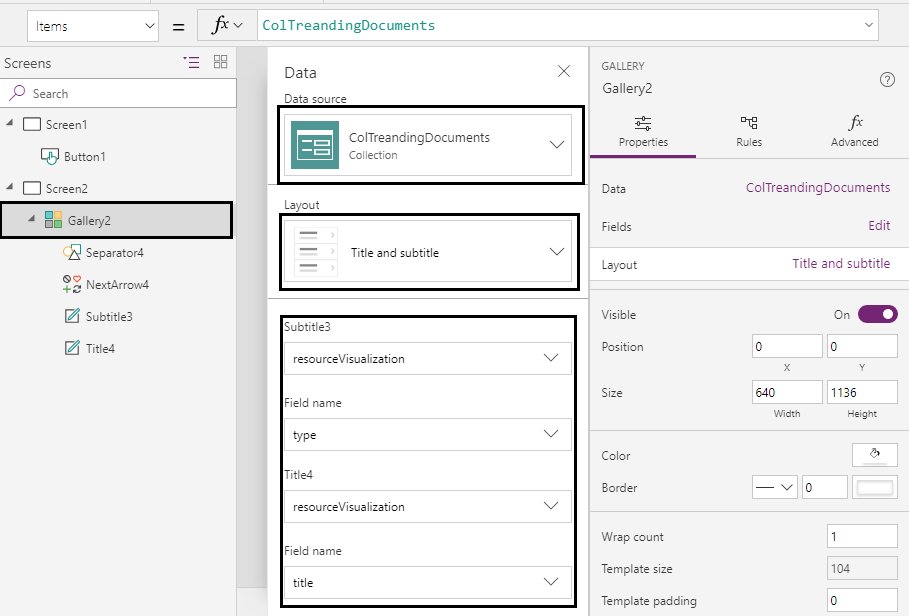
- On Insert menu add a New screen. Under newly created Scrren2 add Gallery from Insert menu. Now change Gallery data source to ColTreandingDocuments and Layout to Title and subtitle. Also, change columns Title and subtitle whatever you want. Here I use Document title and type columns. To change Gallery data source and layout read my blog PowerApps integration with SharePoint

- Once you Run an app and click on Button it redirects to Screen2 and you get all current user trending documents.

You also see trending documents from Delve profile.
References
