This post was most recently updated on July 31st, 2024
Selenium Grid allows to run tests in parallel mode on different machines and different browsers available on that machines. Selenium grid working is based on Master Slave architecture.
Main Components of Selenium Grid are:
1. Hub: Hub acts as a master in Selenium Grid. There will be a single hub in the grid which will know the configuration of each registered node. When specific test requirements are given to the hub, then hub searches for the node which matches the test requirements. If hub founds a node which matches the test requirements, then test will be executed on that node machine. If node with required specifications is not found then hub returns an error.
2. Node: Node acts as slave in Selenium Grid. There can be one or more nodes present in the Grid. Node machines can have different configuration like OS, different versions of browsers etc… It is not mandatory for a node to have same configuration like that of hub machine. Nodes are dependent on Hub.
Steps to Configure Selenium Grid:
There are 3 major steps in configuration of selenium grid
1. Configuring Hub machine
2. Configuring Node machine
3. Executing script

1. Configuring Hub machine:
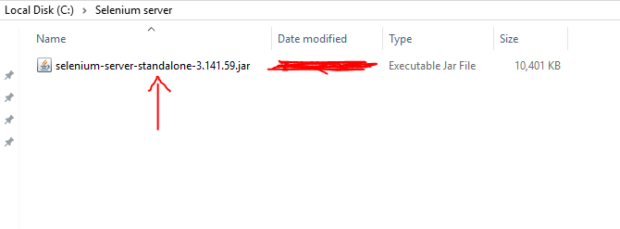
a. Download Selenium server jar file from this location on the hub machine.
b. Create a ‘Selenium server’ folder on C drive and keep the jar file inside this folder.
(Note: User can keep the ‘Selenium server jar file’ at any desired location.)

c. Open Command Prompt and navigate to Selenium server jar file location. Once navigated to Selenium sever jar file location, give the below command in the command prompt:
java -jar selenium-server-standalone-3.141.59.jar -role hub
Once the above command is executed the selenium server starts and hub will be launched on the machine. Below is the screenshot of the command prompt when above command is executed.

Whether hub is up and running can be validated by navigating to: http://localhost:4444
Note:
- Be careful to change the ‘selenium server standalone jar file’ version accordingly. 2.
- By default port ‘4444’ is assigned to the web interface by Selenium Grid. If this port is already assigned or we want to use any other port then following command can be used: java -jar selenium-server-standalone-3.141.59.jar -port 4455 -role hub.
2. Configuring Node machine:
a. Download Selenium server jar file from this location on the node machine also.
b. Create a ‘Selenium server’ folder on C drive and keep the jar file inside this folder.
(Note: User can keep the ‘Selenium server jar file’ at any desired location.)
c. Open Command Prompt and navigate to Selenium server jar file location. Once navigated to Selenium sever jar file location, give the below command in the command prompt:
java -jar selenium-server-standalone-3.141.59.jar -role node -hub http://192.168.0.17:4444/grid/register
Note: In place of ‘192.168.0.17’ user can write the IP address of the his/her own machine
d. Once the above command is fired then something similar to below screenshot will be seen in the command prompt
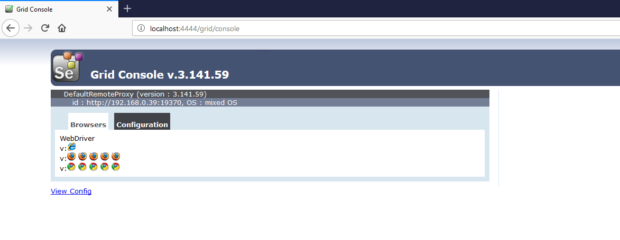
e. Now on the hub machine open any browser and navigate to http://localhost:4444/grid/console. Once navigated to the url, hub will display the nodes connected to it and all required information of the nodes. For example, in the below screenshot one node with id: ‘192.168.0.39’ can be seen connected to the hub. All the required information of the node machine such as different browsers, IP address of the node machine, OS of the machine etc.. is displayed on the console. From the node machine which is connected to hub, by default 5 firefox browsers, 5 chrome browsers and 1 IE browser can be used.

From the above screenshot, we can see current node machine has by default 5 firefox browsers, 5 chrome browsers and 1 IE browser.
3. Executing script: Below is the sample code, if this code is executed on the hub machine then script will run on node machine.
|
1 2 3 4 5 6 7 8 9 10 11 12 13 14 15 16 17 18 19 20 |
import java.io.IOException; import java.net.URL; import org.openqa.selenium.Platform; import org.openqa.selenium.WebDriver; import org.openqa.selenium.chrome.ChromeOptions; import org.openqa.selenium.remote.DesiredCapabilities; import org.openqa.selenium.remote.RemoteWebDriver; public class Grid_SetUp { public static void main(String[] args) throws IOException { DesiredCapabilities capabilities = new DesiredCapabilities(); capabilities.setBrowserName("chrome"); capabilities.setPlatform(Platform.WINDOWS); ChromeOptions options = new ChromeOptions(); options.merge(capabilities); String hubUrl = "http://192.168.0.17:4444/wd/hub"; WebDriver driver = new RemoteWebDriver(new URL(hubUrl),capabilities); driver.get("http://www.google.com"); System.out.println(driver.getTitle()); } } |
Decoding the script:
a. Using Desired capabilities we have set the platform and browser on which we want to execute the code
b. Here we have to use Remote Web Driver to access the url. Remote Web Driver also accepts the Desired capabilities
Note:
- Here, user should make sure that chromedriver version is same on hub and node machines. In case we are using firefox browser then geckodriver version should be same.
- Suppose, many nodes are connected to the hub, then hub decides on which node the script should be executed. Through Desired Capabilities user will give the specific requirements on which machine the script should run.

