Hello everyone, in this post we will discuss about way to publish SharePoint Hosted Add-ins.
SharePoint Add-ins overview
There are two basic kinds of SharePoint Add-ins — SharePoint-hosted and provider-hosted.
When you’ve finished developing, deploying and testing SharePoint Add-in the final step is making that add-in available to your users or clients. This can do by publishing the add-in to one of two places:
-
Site content add-in catalog. Publish your add-ins to an internal organization add-in catalog, hosted on your SharePoint deployment, to make them available to users with access to that SharePoint deployment.
-
MS Office Store. Publish your add-in to the Office Store to make the add-in publicly available, so that it can be acquired by users or other client of any SharePoint deployment.
Publishing to an add-in catalog
If you’re creating SharePoint Add-ins for your own organization or a specific corporate/business client, instead of the publish in Office Store, you would like to publish your add-in to an internal add-in catalog hosted on SharePoint. This add-in called private add-in which dedicated to site collection in a SharePoint web application (or a SharePoint Online tenancy) that hosts resources like list, document libraries for SharePoint Add-ins and Office Add-ins. Putting the catalog into its own site collection makes it easier for the Site Collection Administrator or Tenant Administrator to limit permissions to the catalog. Here we simply upload add-in in the form of .app file into a SharePoint add-in catalog in hosted site content
Steps to Publish SharePoint Hosted Add-ins by using Visual Studio
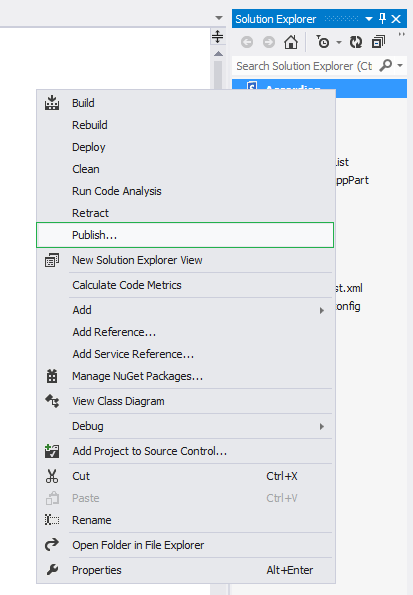
- Be sure when you want to publish add-in, AppManifest file correctly setup. Make sure that add-in have correctly configured such as Title, Name, Version, Permissions whether it highly trusted or not, and also Supported Locales (language). Next is publish your app. Go to Add-in Solution Explorer and Right Click on add-in Solution and then click on Publish option.


Publish apps for Office and SharePoint wizard show summary about our add-in first few lines tell us about seller dashboard with how to validate apps. Next will show app type with hosting type. Click on Finish button after conforming app summary. It successfully package our app in .app file.

- Now we upload .app file in Site content app catalog. Now go to the developer site and open Apps in testing directory, here all add-ins are listed as draft. To deploy our click on new app to deploy


Now Deploy app dialog box will pop up, here upload link present to deploying our app which stored in local machine. On upload click, file dialog will open for upload a .app file

Here I upload Accordion.app package now click Deploy.
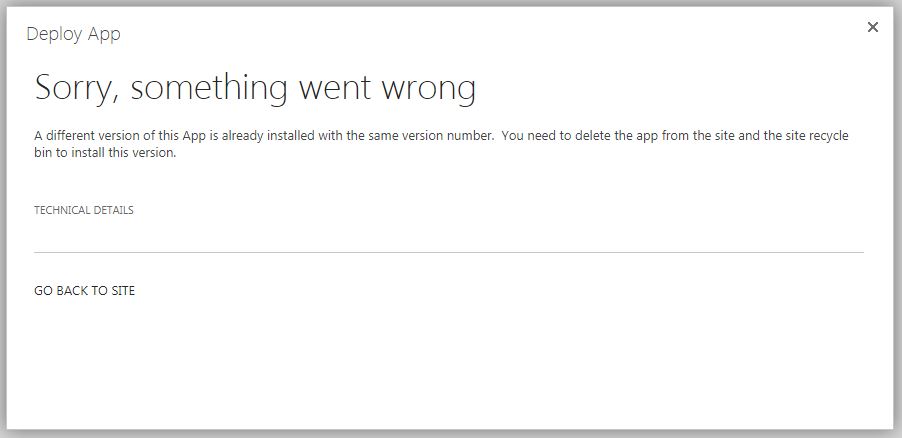
- On Deploy SharePoint will check app is already exits or not, if exits then check version of .app file.

In my scenario I try to upload Accordion.app app which was already exits in app catalog so SharePoint throw an error message. In such condition we need to delete app which previously installed.

After successfully removal of app from catalog, retry to upload the add-ins.
Publishing to the Office Store
To publish an add-in to the Office Store, here we make add-in public.
When you upload an add-in to the Office Store for publication, Microsoft performs a series of verification checks to ensure your add-in is as per the Microsoft Standard. For example, it checks whether the add-in manifest file is valid based on SharePoint Guidelines including if add-in contain elements that not been use, or SharePoint Features with a scope that is broader than Web or any suspicious code inside add-in manifest file. The package is also inspected for objectionable content. If the add-in package passes all tests, it’s wrapped into a file and signed by Microsoft.
Steps to Publish SharePoint Hosted Add-in in Office Store
- Registration and Submission:
- Sign in to seller Dashboard : https://sellerdashboard.microsoft.com/Registration
- Register as an app developer: https://developer.microsoft.com/en-us/store/register
Fill basic info like account type (company account / individual) and create your marketing profile (how you will be shown on marketplace). After that Microsoft will verify your profile which will take up to 14 days.
- Review: They’ll check if your app meets the criteria and send you the metadata requirements and instructions for on boarding your app.
- Staging: On board your app for staging and testing. Here we need to upload the .app file and fill in an app related informations.
- First you need to give general info about the app like title, version, release date and categories where your app belongs.
- Then you need to give possible testing notes and support documents (urls, not downloadable files).
- If you are planning to release your Add-in in multiple languages be prepared to submit description of Add-in in every language as well as 1-5 screenshots.
- Lastly you need to set up pricing and possible trial option. Here validation step about app done by Microsoft it will take 4 days.
- Publish: Once you and Microsoft are satisfied with the staging and testing results, then they post your app!
Note: Microsoft will send acknowledge mail in every stages during publishing it include app info, feedback and guidelines of the AppSource app listing criteria etc.
References:
