This post was most recently updated on July 29th, 2024
This article will cover below points:
- Use of custom command instead of protractor along with user defined options to control the execution of script.
- Protractor script execution for different test suites using different configuration files i.e. In regression test suite we will execute all spec files In smoke test suite we execute only selected spec files.
- This article contains code to store console output and error logs on separate files.
For example:
- custom_cmd -s : It will execute protractor script with config file written for smoke test suite execution
- custom_cmd -r : It will execute protractor script with config file written for regression test suite execution
Where custom_cmd is keyword we are using in place of protractor (Note: here you can use your own keyword).
while -r and -s are the options which are used to control the execution based on configuration file.
Setup And Installations :
Before starting with detail steps, here are the list of pre-requisite
- Install Eclipse IDE for Java (latest version)
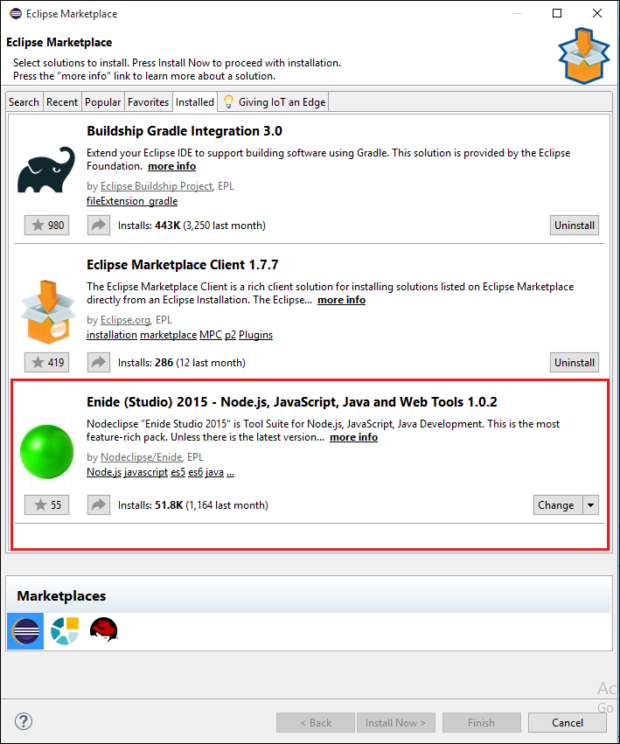
- Install Enide (Studio) 2015 from eclipse market place.
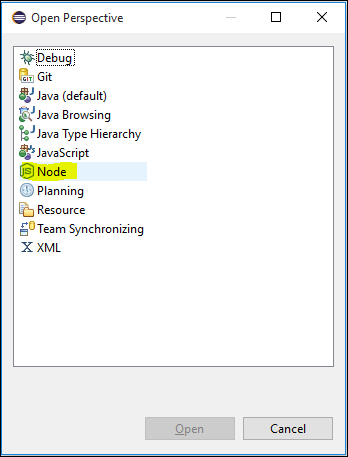
- Change perspective from Window > perspective > Open Perspective > Other(click on other to view more) and select Node from available options
Image 1: Open perspective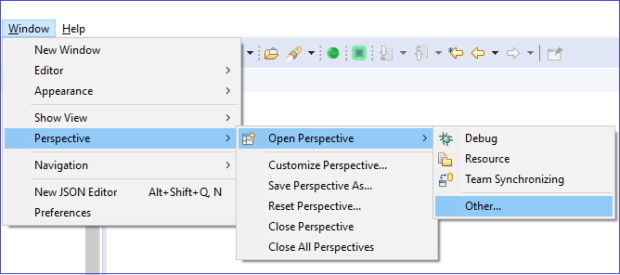
Image 2: Select Node from perspective
Project Creation And Project File Structure
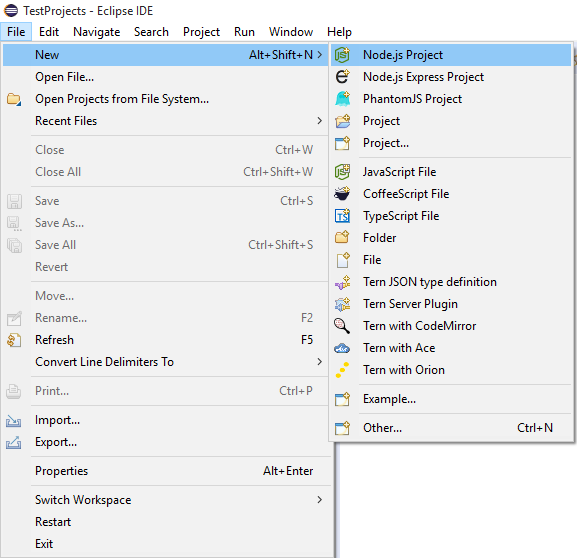
- To create new “Node.js” project. Go to File → New → Node.js Project
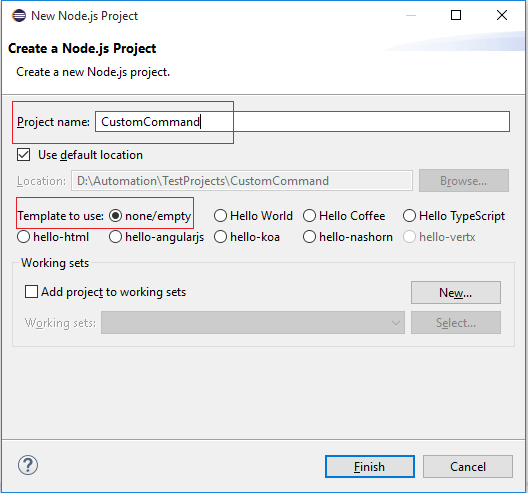
- Provide project name & select none/empty template to use.
- Create below mention folders for the project
- → bin : It contains index.js file
- → exec_config : It will contain different config.js files
- → TestData : It will contain test data in form of excel or json.
- → TestScript : It will contain test script or specs which will contain test cases.

Steps To Create Sample Project With Custom command
Step 1: Create package.json file using npm int command
- → Open command prompt and go to project folder location.
- → Run “npm init” command and create package.json file
npm init

Step 2: Edit package.json file
→ In package json replace {“main”: “index.js”,} with {“main”: “./bin/index.js”,} (neglect curly braces).
→ add 2 more keys in package.json file.
For “bin” key,
“bin”: { “custom_cmd”: “./bin/index.js” },
where custom_cmd is our custom command (we use to execute our script instead of protractor)
For “devDependencies” key,
“devDependencies”: { “commander”: “^4.0.1” },
Finally our package.json will be look like.

Step 3: Install “commander” module using below command.
→ npm i commander

Step 4: Install “protractor” at project location using below command.(without -g)
→ npm i protractor
Step 5: Create index.js file.
- Right click on bin folder and select New > JavaScript file.
- Give file name as “index.js” and click on finish button.
Here is a javascript code for index.js file
|
1 2 3 4 5 6 7 8 9 10 11 12 13 14 15 16 17 18 19 20 21 22 23 24 |
#!/usr/bin/env node const commander = require('commander'); const program = new commander.Command(); const { spawn } = require('child_process'); let configFilePath=""; program.option('-r, --regression', 'Execute regression test suite.') .option('-s, --smoke', 'Execute smoke test suite.'); program.parse(process.argv); if (program.regression) { console.log('Execution of regression test suite started.'); // Code to execute regression test suite configFilePath="./exec_config/configForRegTS.js" const bat = spawn('cmd.exe', ['/c', 'protractor '+configFilePath+' > output.log 2> error.log']); } else if (program.smoke) { console.log('Execution of smoke test suite started'); // Code to execute smoke test suite configFilePath="./exec_config/configForSmokeTS.js" const bat = spawn('cmd.exe', ['/c', 'protractor '+configFilePath+' > output.log 2> error.log']); } else{ //else block for message purpose. console.log('Please select smoke or regression test suite using -s or -r'); } |
Step 6: Create config file.
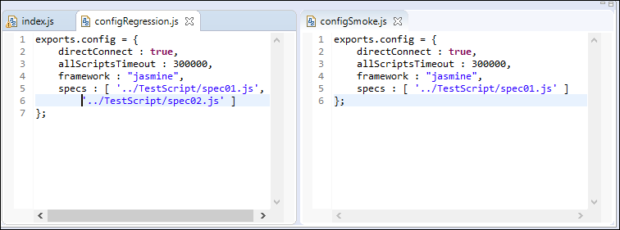
As per index.js file, we required at least two config file in exec_config folder.
→ One for regression test suite pack
→ Second for smoke test suite pack

Here is sample code for implementation of one configuration file
|
1 2 3 4 5 6 7 |
exports.config = { directConnect : true, allScriptsTimeout : 300000, framework : "jasmine", specs : [ '../TestScript/spec01.js', '../TestScript/spec02.js' ] }; |
Here is a screenshot for implementation of both configuration file.
Step 7: Create 2 spec files under TestScript folder which contains test cases.
Two spec files for test case execution.
- For regression test suite → spec01.js and spec02.js
- While for smoke test suite → spec01.js
We have used sample spec files available at protractor site.
Here two spec files
spec01.js
|
1 2 3 4 5 6 7 8 9 10 11 12 13 14 15 16 17 18 19 20 21 22 23 24 25 26 |
describe('Protractor Demo App', function() { var firstNumber = element(by.model('first')); var secondNumber = element(by.model('second')); var goButton = element(by.id('gobutton')); var latestResult = element(by.binding('latest')); beforeEach(function() { browser.get('http://juliemr.github.io/protractor-demo/'); }); it('should have a title', function() { expect(browser.getTitle()).toEqual('Super Calculator'); }); it('should add one and two', function() { firstNumber.sendKeys(1); secondNumber.sendKeys(2); goButton.click(); expect(latestResult.getText()).toEqual('3'); }); it('should add four and six', function() { // Fill this in. expect(latestResult.getText()).toEqual('10'); }); it('should read the value from an input', function() { firstNumber.sendKeys(1); expect(firstNumber.getAttribute('value')).toEqual('1'); }); }); |
spec02.js
|
1 2 3 4 5 6 7 8 9 10 11 12 13 14 15 16 17 18 19 20 21 22 |
describe('Protractor Demo App', function() { var firstNumber = element(by.model('first')); var secondNumber = element(by.model('second')); var goButton = element(by.id('gobutton')); var latestResult = element(by.binding('latest')); var history = element.all(by.repeater('result in memory')); function add(a, b) { firstNumber.sendKeys(a); secondNumber.sendKeys(b); goButton.click(); } beforeEach(function() { browser.get('http://juliemr.github.io/protractor-demo/'); }); it('should have a history', function() { add(1, 2); add(3, 4); expect(history.count()).toEqual(2); add(5, 6); expect(history.count()).toEqual(0); // This is wrong! }); }); |
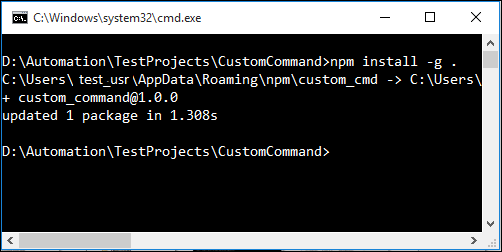
Step 8: Install our project using npm install command .
npm install -g .
Package successfully installed.
Step 9: Execute test script
Now we are ready to use our custom command to execute protractor script.
- Custom command: custom_cmd
- Options:
-
- -r to execute regression test suite pack.
- -s to execute smoke test suite pack.
Go to project location and hit
- custom_cmd -r to execute regression test suite pack. OR
- custom_cmd -s to execute smoke test suite pack.
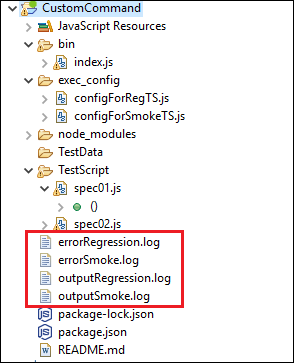
After each test suite pack execution, script will generate output and error log files.
Image: Both script executed using custom command and options
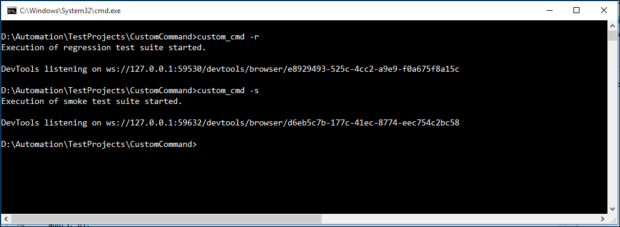
Image: After execution, output and error log generated.
