This post was most recently updated on August 2nd, 2024
In this post I would like to show you what exactly chrome control is and how you could create chrome control to branding your add-in with the host site.
The chrome control in SharePoint enables you to use the header styling of a specific SharePoint site in your add-in without needing to register a server library.
The functional implementation details of chrome control reside in “SP.UI.Controls.js” file located in the C:\Program Files\Common Files\Microsoft Shared\Web Server Extensions\15\TEMPLATE\LAYOUTS
The Chrome Control basically applying the custom CSS Styles manually by means of a Client Side Rendering Control to an add-in page.
Steps to create simple chrome control:
-
-
- Create ChromeControl add-in in Microsoft Visual Studio. For more info in How to create SharePoint Hosted Add-ins please click here.
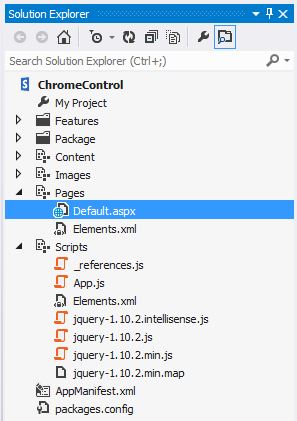
Solution Structure of Chrome Control Add-in
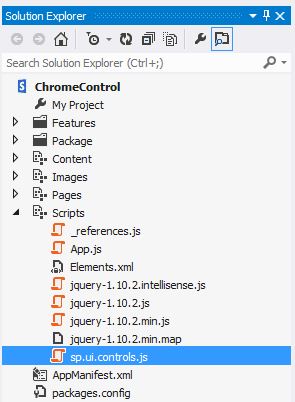
- Add sp.ui.controls.js for this you simply drag and drop js into Scripts module. (sp.ui.controls.js file located in C:\Program Files\Common Files\microsoft shared\Web Server Extensions\15\TEMPLATE\LAYOUTS)

- To use the chrome control, first add a reference of sp.ui.controls.js, then add an empty <div id=”chrome_ctrl_container”></div> to your default.aspx page.

- Create ChromeControl add-in in Microsoft Visual Studio. For more info in How to create SharePoint Hosted Add-ins please click here.
-
- Next, invoke the chrome methods renderChromeControl() in your JavaScript. Use below reference code.
<script type = “text/javascript” >
|
1 2 3 4 5 6 7 8 9 10 11 12 13 14 15 16 17 18 19 20 21 22 23 24 25 26 27 28 29 30 31 32 33 34 35 |
var hostWebUrl; var hostLayoutsUrl; $(document).ready(function() { hostWebUrl = getQueryStringParameter("SPHostUrl"); hostLayoutsUrl = hostWebUrl + "/_layouts/15/"; $.getScript(hostLayoutsUrl + "SP.UI.Controls.js", renderChromeControl) }); function renderChromeControl() { var options = { "appHelpPageUrl": "../Pages/Help.html", "appIconUrl": "../Images/AppIcon.png", "appTitle": "Chrome Control", "siteTitle": "Go to Host Site", "siteUrl": hostWebUrl, "settingsLinks": [{ "linkUrl": "../Pages/AboutUs.html", "displayName": "About Us" }, { "linkUrl": "../Pages/Services.html", "displayName": "Services" }] }; var nav = new SP.UI.Controls.Navigation("chrome_ctrl_container", options); nav.setVisible(true); } function getQueryStringParameter(paramToRetrieve) { var params = document.URL.split("?")[1].split("&"); var strParams = ""; for (var i = 0; i < params.length; i = i + 1) { var singleParam = params[i].split("="); if (singleParam[0] == paramToRetrieve) return decodeURIComponent(singleParam[1]); } } |
</script>
-
Inside “renderChromeControl()” method, we are Object holding the Chrome Configuration Options
appHelpPageUrl – Optional. Help Page Url for the App
appIconUrl – Required. Icon URL that we need to show at the top header of the App
appTitle – Required. Header Title for the App
siteTitle – Optional. Site Title for the App
siteUrl – Optional. Site Page Url for the App
settingsLinks – Links to be shown under settings menu
Note: The values in the ‘options’ object aren’t required but are helpful in branding the chrome.
-
Build and run the solution.

